8.17.2009

Entry Redo (after!)


ta-DA! The entry is done! We put the finial pieces together last week. What do you think?!

A few other things to notice:

1. Framed historical pictures from 1893-1912 from Keeler with the new Belwith mission, vision, and values statements. Tim LaDuke, a Holland based photographer/artist, was able to print the photos over lunch while we ate some awesome burritos down the street. I used frames/mats from Target and the finished result is classy and simple.

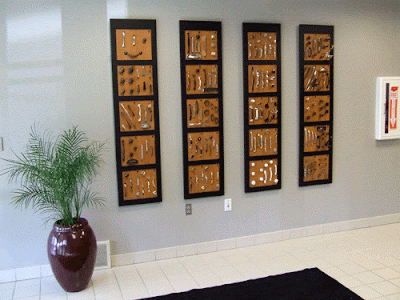
2. Hardware wall. We used 4 wall displays, lucky that there were exactly 4 left from a previous project, and mounted display boards. The products shown are what our customers get for their showrooms and retail stores.

3. Plants. New (real) plant in the beet red vase and a fake orchid plant on the reception counter. Only my Grandma seems to know how to keep the real ones alive. Fake is better for a busy office!

4. Pillows. Kind of a small accent, but I sewed them. And I often fix them when people push them around on the sofa. It bugs me when they're out of place.


Gold Leafed Logo


Our red accent wall needed a bright logo. We toyed around with using sheet brass, metallic sticking paper, and spray paint. In the end, gold leaf won. I wandered around Hobby Lobby looking for a good metallic material and came across packets of variegated leaf, with colors of gold, copper, and light blue and greens. The variety of colors, I thought, would look great on the red.

Despite it being my first time using gold leaf, it was easy to follow the steps: prime, base paint, spray adhesive, brush on the flakes, and seal.

Irv and Gary, part of our model making team, cut out the 36" tall logo from a laminated MDF using a band saw. Jeff finish sanded and primed. I applied the finish. Jeff helped me to stick the logo to the wall (yea for tall people!).

You can see one of the pieces in progress and the finished logo. It seems to be a hit.

Reception Desk Fiasco


Our efforts to reuse the reception desk turned in to a mini nightmare. The painting of the base went as planned: dark grey paint sprayed on and let to dry. The painting of the four surfaces (2 for the desk, 2 for the counter) became a pain in the you-know-what when the black paint WOULD NOT DRY! After two weeks of it air drying, baking in our finishing ovens, and sitting in the sun, it still could not be considered completely dry . . . so we sealed it. (This was actually Jeff's decision and I think he was a little nervous about doing it.) The 2 desk surfaces have done ok so far with the water based poly. The upper surfaces were sealed with a thick mixing resin, like the thick clear coating you'd see on a bar or restaurant table.

It truly became a "fiasco" when the thick resin hardened too quickly and in some parts pulled away from the paint. It was not consistent enough to claim that that was the texture we were going for: smooth and thick as glass, then bubbly, then not even covering the paint, all on one surface. It was gross! Our finishing expert, Bob, said they were fire wood.

After the resin failure we used bondo to fill the dips. After sanding and priming I determined there were still too many imperfections to paint and poly it. I decided to re-texture it with drywall compound (spackle), primed, and painted it with loose brush strokes. After a coat of poly, it resembles a venetian plaster look. And I've gotten a lot of compliments on it.

The previous explaination of the steps we went through probably bored or confused you; we were just frustrated. To say the least, I'm glad that the surfaces are done.

7.29.2009

Table Upgrade with Marble


My roomie Lauren had the great idea to add marble to these otherwise plain, contemporary tables (from American Signature furniture). We picked out tiles from Lowe's that have a brown/black background with veins of white and pink. The pink was supposed to pick up the accent wall color which is a red shade. Irv, Model Maker and fine woodworker, inset the tiles. $5 for the marble tiles and additional labor, you can't go wrong.

Reception Desk, in Progress


Here you can see our finish engineer putting on the first coat of paint to our reception desk. We usually use the spray booth behind him for hardware and other small projects, but this piece was too large. It's nice to have a facility and know-how to be able to do the work in-house. Thanks Bob!

RMS Studio Jewelry


Check out the website of the same name (http://www.rmstudiojewelry.com/) for more extraordinary examples of fine craftsmanship. Her process involves anodizing silver and using a tiny drill to puncture through to the bright silver underneath. Precise, delicate, and unique.

Glowing Wood Sculptures


Turned wood glows from a light within. The booth was dark and these lights did not look like wood at first glance. I had never seen something like this. The website is ok, see for more examples: http://www.glowingwoodsculputres.com/

Printmaker Wroblewski


Another artist from the AA Art Fairs. Great compositions and a wide range of subject matters. The intricacy, number of colors, and the "white" space changes per piece. Refreshing to see such a collection of work from one artist. Check out more work on his website: http://www.nickwroblewski.com/

Sculptor Robbins


This artist was lacking the enthusiasm to talk with us about process (borderline rude), but his sculptures contain movement and grace and had beautiful finishes. The website stinks though you can see more works. http://www.robbierobins.com/

Paintings by Daniel J Barry


An artist we spotted at the Ann Arbor Art Fairs. He had nice compositions and great use of color: purple and lime green? Turns out he also does architecture. Check out his website for more: http://www.danieljbarry.com/

Stars of the A.A. Art Fairs

Our design group took a day trip out to the Ann Arbor Art Fairs. Artists travel from across the country to show their works and the quality of their work is HIGH. We enjoyed seeing a variety of mediums: woodworking, sculpture, 2D paintings, prints, etc, and jewelry. (Most) people we talked with were nice, thoughtful, and willing to share their tips and tricks. See following posts for individual artists . . .

7.20.2009

Corporate Entry Update (during)

The painting is done! Engineer Jeff stayed late Friday to help prime and we came back Saturday A.M. to put on the top coats. The accent wall is as close to our Belwith red color as I could match with paint chips at the hardware store. A designer here suggested that I could have gotten paint that was the Pantone color . . . perhaps next time. Has anyone done that?

After painting, my friend Lauren and I took off to see what furnishings were available within the budget. A new sofa and cocktail tables are on order! Her creative idea to use marble will bring texture to the tables, for which I've signed up the model makers to help realize her vision. I love working with creative and skilled people - so much is possible!

Now, to figure out what material to use for the logo . . . It's going on the red wall. We've discussed brass, gold leafing, and sandblasting mirror. If you have any ideas, please leave a comment. -Thanks!

Corporate Entry Update (before)

I have a small budget and free reign to update our entry area. For a design (and delivery) centric company, our environment has been pretty boring and, as you can see from the pictures, it leaves much to be desired. It probably hasn't been touched in 20 years. The plan includes paint, more modern furnishings, revamping the receptionist's desk, and artwork that shows our company history and new Belwith logo.

I hope to have everything done within 2 weeks. Stay tuned for the during (and after) photos!

6.17.2009

Copyright 101


Throughout the years, Belwith Products and its predecessors (Keeler, Belwith Int, Hickory Hardware) have put copyright symbols on the parts and have sought design protection in the form of patents. We know first hand how complicated the process can be!

For those interested in basic information about what a copyright is or if you need some tips on getting started in filing a copyright, visit the Design*Sponge site here. Advice by Amy J. Everhart who has her own law firm and blog is targeted to individuals in the creative community.

WARNING! You'll probably learn something!

6.09.2009

Define it Quick: Bail


A bail is a piece of hardware usually free-moving which is grasped to open a drawer. In the picture, it is the "u" shaped piece.

6.01.2009

Define it Quick: What's this?

This is a new feature for the Belwith Blog. We're going to quickly define hardware and home furnishings terms, hence the feature's name: Define it Quick!

Thanks for getting this idea going Deb!

5.21.2009

National Geographic: Patterns in Nature


Inspired by nature . . . I think most of us are. Upholstery patterns, furniture forms, inlays, and even our hardware designs feature plant and flower motifs. Perhaps these close-up pattern studies will inspire you. I like the saturated colors and the clarity of focus. Click here for more.

On the Street Fashion


In order to NOT violate the copyright . . . I'm not posting pictures from this photo blog: The Sartorialist But the pictures are amazing to look through. I'm a bit of a people watcher and the designer in me loves seeing what "looks" people put together, especially from around the globe. The above picture I took in Milan. Love the orange-on-orange! Not something I see everyday in Michigan!

I've heard that European fashion comes over to the States. Also, that home furnishings follows fashion. This type of site could be good for getting a glimpse into what people currently, or will soon here, find desireable. (probably not the orange-on-orange though!)

IKEA Hacker


I really enjoy seeing the creativity of people, designers and non-designers. The IKEA Hacker blog showcases great solutions to everyday problems and some plain old funky stuff. The above bench was made of IKEA parts and holds a litter box. Nice huh? Looking at civilian solutions could help designers create products that fill a real functional need.

Click here to see some fun projects.

5.14.2009

Google "Spider Web" Design


While I'm not a huge touter of Google, I do use it. Today I saw and messed around with a new format for searching, called: Wonder Wheel. Click "show options" to see this option and start searching by a visual web.